
1. Banana Pi镜像
笔者使用的是BPI-M3,详情查看官网地址。
2. BPI-M3硬件参数
| 名称 | 参数 |
|---|---|
| CPU | A83T ARM Cortex-A7 octa-core, 512KB L1 cache, 1MB L2 cache |
| GPU | PowerVR SGX544MP1· Comply with OpenGL ES 2.0, OpenCL 1.x, DX 9.3 |
| SDRAM | 2GB LPDDR3 with 733MHz(shared with GPU) |
| Power | 5V@2A via micro USB power |
| GPIO | 40 Pins Header, 28×GPIO, some of which can be used for specific functions including UART, I2C, SPI, PWM, I2S. |
| Network | 10/100/1000Mbps Ethernet (Realtek RTL8211E/D) |
| Wifi | WiFi 802.11 b/g/n (AP 6212 module on board) |
| Bluetooth | BT4.0 |
| Storage | MicroSD(TF) card, SATA2.0(up to 2TB - USB-to-SATA: GL830), eMMC 8G on board (option:16/32/64G) |
| Display | Supports multi-channel HD display: HDMI 1.4 (Type A - full),MIPI Display Serial Interface (DSI) for raw LCD panels,1.4 HDMI resolutions from 640×480 to 1920×1200 |
| Video | Multi-format FHD video decoding, including Mpeg1/2, Mpeg4, H.263, H.264, etc H.264 high profile 1080p@60fps or 720p@120fps encoding, HEVC/H.265 decoder 1080P@30fps with software. |
| Audio outputs | HDMI, analog audio (via 3.5 mm TRRS jack), I2S audio(also potentially for audio input) |
| Camera | Parallel 8-bit camera interface or MIPI Camera serial Interface(CSI) |
| Audio input | On board microphone |
| USB | 2 USB 2.0 host, 1 USB 2.0 OTG |
| Buttons | Reset button, Power button, U-boot button |
| Leds | Power status Led and RJ45 Led |
| IR | on board IR receiver |
3. eMMC烧写流程
- 下载所需的Linux镜像Debian 8 Jessie Lite和烧录工具Win32 Disk Imager。

根据Win32 Disk Imager 的使用方法,将镜像
2016-05-15-debian-8-jessie-lite-bpi-m3-sd-emmc.img烧写到SD卡中。为了方便起见,将镜像
2016-05-15-debian-8-jessie-lite-bpi-m3-sd-emmc.img重命令为ubuntu.img,然后将其复制到SD卡中。注:此处也可不更改名称,但必须和后续名称一致。
将卡插入开发板的SD卡槽后,启动并连接设备后。
通过命令
fdisk -l查看系统各个存储设备及分区,如下:
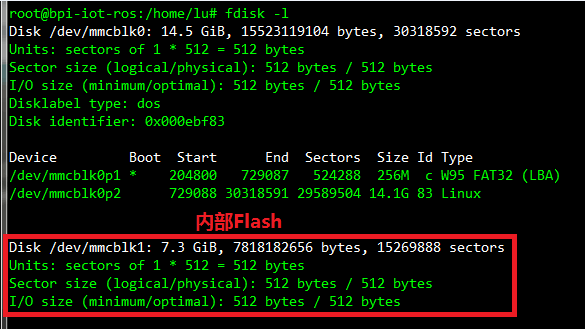
- 使用指令将SD卡中的.img镜像烧写到eMMC中,如下:
代码
sudo dd if=ubuntu.img of=/dev/mcblk1 bs=10MB

到此,Banana Pi镜像安装完成,接下来的一切开发和linux中基本一致。若开发板中含有eMMC,强烈建议将系统安装到eMMC中。